Discover my top tips to help your child learn to read. These five breakthrough strategies can significantly impact and enrich your child’s reading journey.
The things I’m going to share are not the most common things in the world of teaching reading, so I’m guessing that you probably haven’t heard of them, or at least haven’t heard of all of them.
However, I do feel that they can really help any parent, carer or educator who is teaching their kids to read.
Let’s go!
*Affiliate Disclosure: Some links lead to Amazon marketplace. As an Amazon associate, I earn from qualifying purchases, at no additional cost to you). There may be additional affiliate links. This helps keep the information on the blog free and available to everyone.
#1 Mnemonic Flashcards
Before your child is able to read, he/she has to learn the letter sounds. This is like step one on the road to reading – super important stuff!
So, let’s talk about getting those letter sounds locked in for your little one.
Some kids seem to breeze through it, but for others (like my own kid), it can be a real brain buster. Learning these sounds can be incredibly time-consuming and frustrating.
If you are going through this with your child too, I’ve been there!
It may look like a really simple task. In principle, it’s only 26 letters, only 26 sounds to get started… But, no, it’s hard. Especially for some children, it can be extremely hard!
You might think they’ve got the sound down one minute, but then, poof – later that day, or the next day… It’s like they never heard that letter sound before in their life!
Does this sound familiar?
That is because the information gets stored only for a little while in their short-term memory. And, well, short-term memory is a sneaky thing, storing info temporarily when what we really want is for those sounds to stick around for good in their long-term memory.
So, what can we do to help children develop this “instinct” of seeing a letter and saying its sound straight away? (Without any sort of hesitation, without thinking about it or guessing)
What really helped us (apart from the usual things, like games and songs, and coloring worksheets and things like that) are mnemonic flashcards.
They have truly been a game-changer.
So, what are these mnemonic flashcards exactly?
These flashcards have a picture embedded in it, like the ones below.
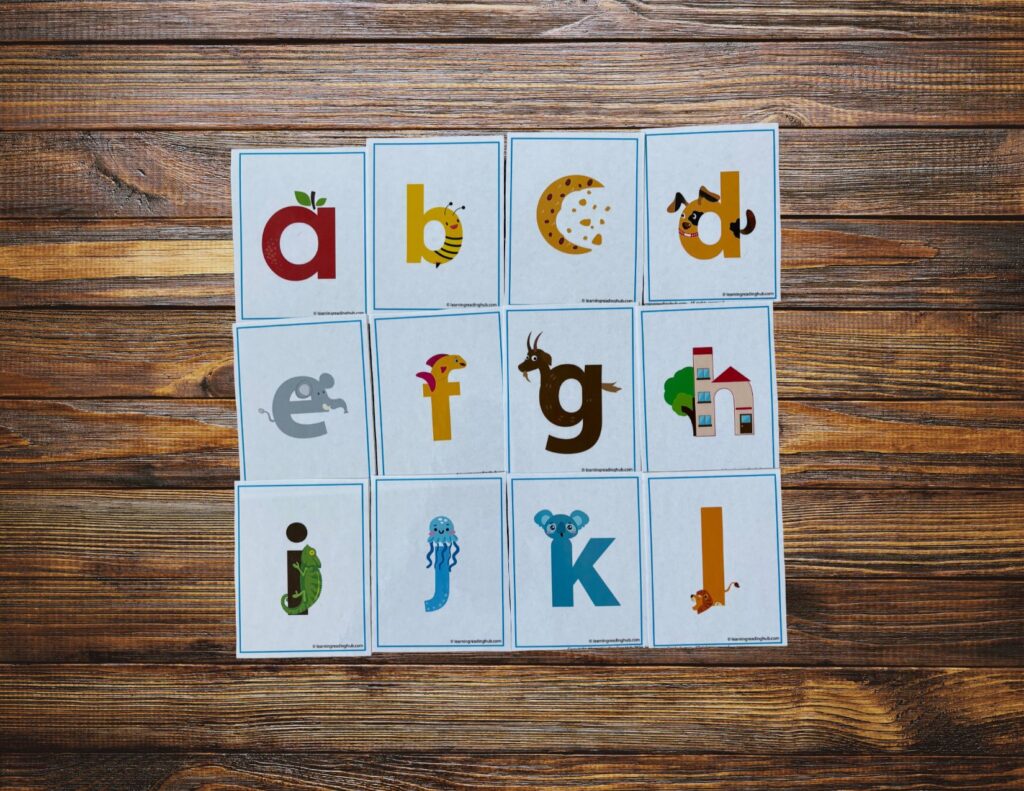
So, for instance:
- The letter the letter “a” has the shape of an “a, a, apple.”
- The letter “b” has the shape of a “b, b, bee.”
- The letter “c” has the shape of a “c, c, cookie.”
- The letter “d” has the shape of a “d, d, dog.”
- The letter “e” has the shape of an “e, e, elephant.”
- The letter “f” has the shape of a “f, f, fish.”
And so on and so forth.
My daughter loved these flashcards, she thought they were really funny, and in her mind, suddenly all of those random letter shapes started to make a lot sense.
Why does the letter “c” have that shape? Because there’s a cookie hiding in it. Why does the letter “d” have that shape? Because “d” resembles the shape of a dog! That’s right!! And that seemed to really help her link the letter form and to the sound.
Since I found this truly interesting, I did research about this topic and found that this is not just a helpful tool for us. Not at all! Research backs this tool up.*
These “embedded mnemonics” are like memory boosters that help kids remember letter sounds faster and for longer. There’s strong evidence from research showing that “embedded mnemonics,” – remember embedded pictures that remind the children of the letter sound – actually improve learning.
Using these mnemonic pictures help kids learn letter and sounds with fewer repetitions. Not only that, it reduces confusion and improves long-term memory. I will leave you links to the research in the description, so you can take a look.
I started to use a set of flashcards, which was helpful, but not a 100%. It was actually causing confusion for some letter sounds.
So, I decided to go ahead and make my own version of flashcards of Mnemonic flashcards, and I’ve called them “PhonixPals Mnemonic Flashcards.”

My main goal when creating was to make them EXTREMELY INTUITIVE. They had to trigger the first word that intuitively came to my kid’s mind when she saw the embedded picture.
This was my top priority, as my child had issues specifically with that (embedded pictures triggering different words than intended) with the first set I initially used.
Apart from that, they are cute and colorful; they contain familiar themes for children (keywords are chosen from children’s everyday world, like animals, food, toys, etc., to resonate with their life and vocabulary); they are clear and free from confusion, including sound confusion; they are fun and engaging to attract children’s attention.
If interested, our Mnemonic Flashcards are available at our “Discover our own Literacy materials” section over here!
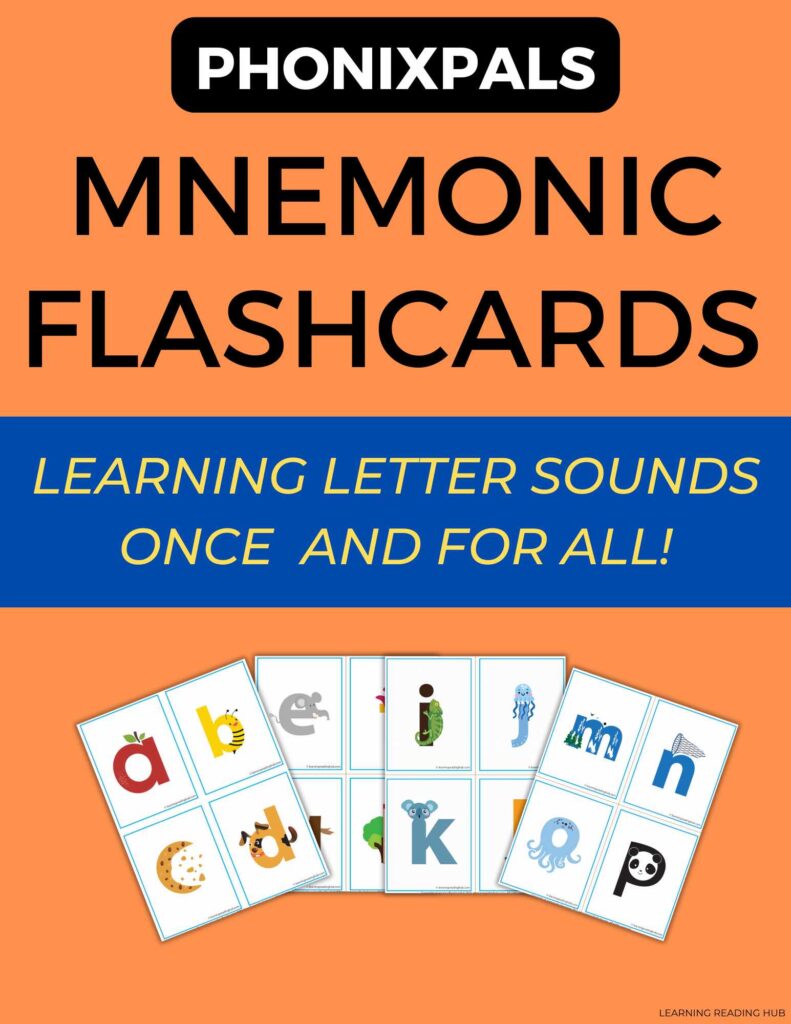
Interested in knowing even more about these flashcards and getting your own copy? Available at the “Discover Our Literacy Materials” section. Check details below!
Oh, and a little tip: avoid those flashcards with letters and pictures underneath. I know… They are everywhere!
Unfortunately, not only do not help children learn the sounds, these flashcards can even be detrimental!
These are the ones I’m talking about.
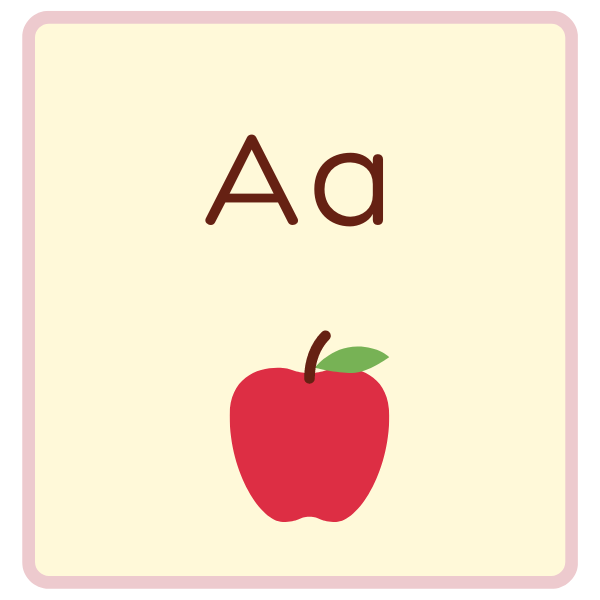
If you don’t want to use any visuals at all, just use plain flashcards.
However, my preference for this stage is using mnemonic flashcards in combination with plain flashcards.
Would you like to download a summary of this article?
For you to keep and refer to any time anywhere!
#2 Using symbols and arrows when reading first words.
As children progress from letter sounds to sound blending and word reading, using aids, such as symbols and arrows under words, can be extremely helpful to help them automate the process of blending.
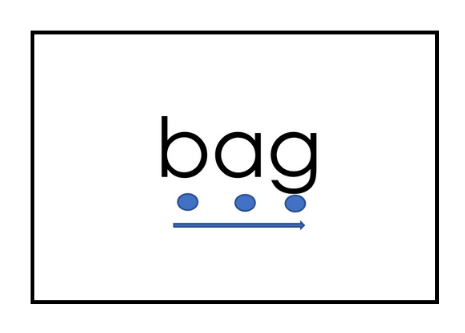
The role of symbols and arrows in reading
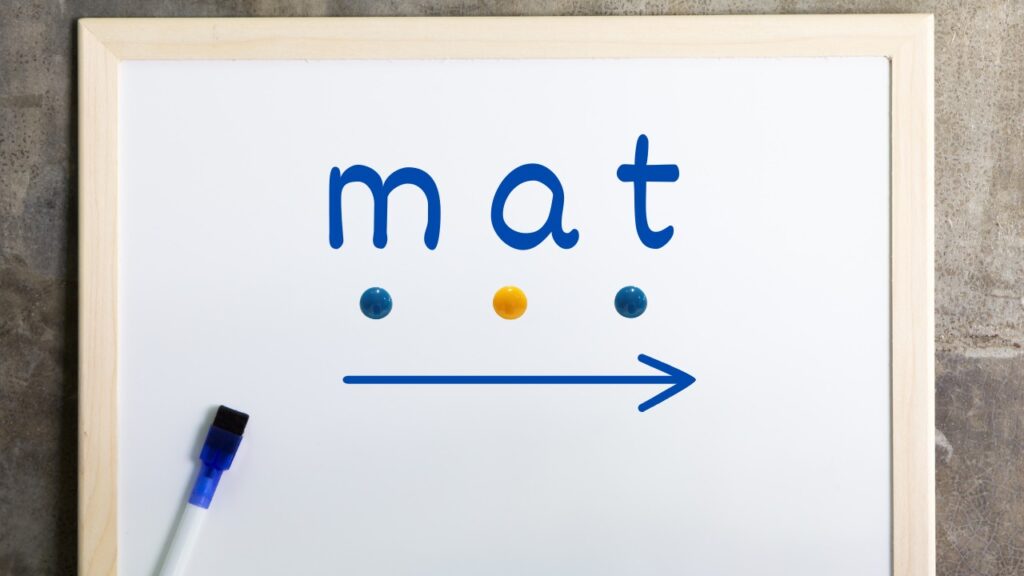
As you can see, we have symbols (dots, in this case), to represent the number of sounds in the targeted word and we have and arrow to remind us of the direction in which reading happens.
This is how it works:
- Your child says the first sound and he/she presses on the first dot.
- Your child says the second sound as he/she presses on the second dot.
- Your child the third one as he/she presses on the last one.
- Finally, he or she’d blend them all together as he or she moves his or her finger along the arrow.
You can create your own flashcards in this way with your targeted words. It’s super simple to do. Just take some palm cards, a piece of paper, or a whiteboard and go ahead and do something similar to the example shown in the picture above.
If you are using a whiteboard I recommend you use whiteboard magnets for the sounds (like the ones below), so your child can press on them without erasing the dots!
Also, be careful when he/she moves his/her finger along the arrow.
So, why are these symbols and arrows so helpful?
Creating these Customized Reading Aids is helpful for several reasons:
- These dots serve as a reminder of the number of sounds in a word.
- The arrow serves as a reminder of the direction in which reading happesn.
- They add a kinesthetic element to reading.
A twist to this strategy is using digital solutions. More specifically, using these digital tactile sliders (see picture below), which are incorporated in an app I will talk about in more detail later on (tip #3).
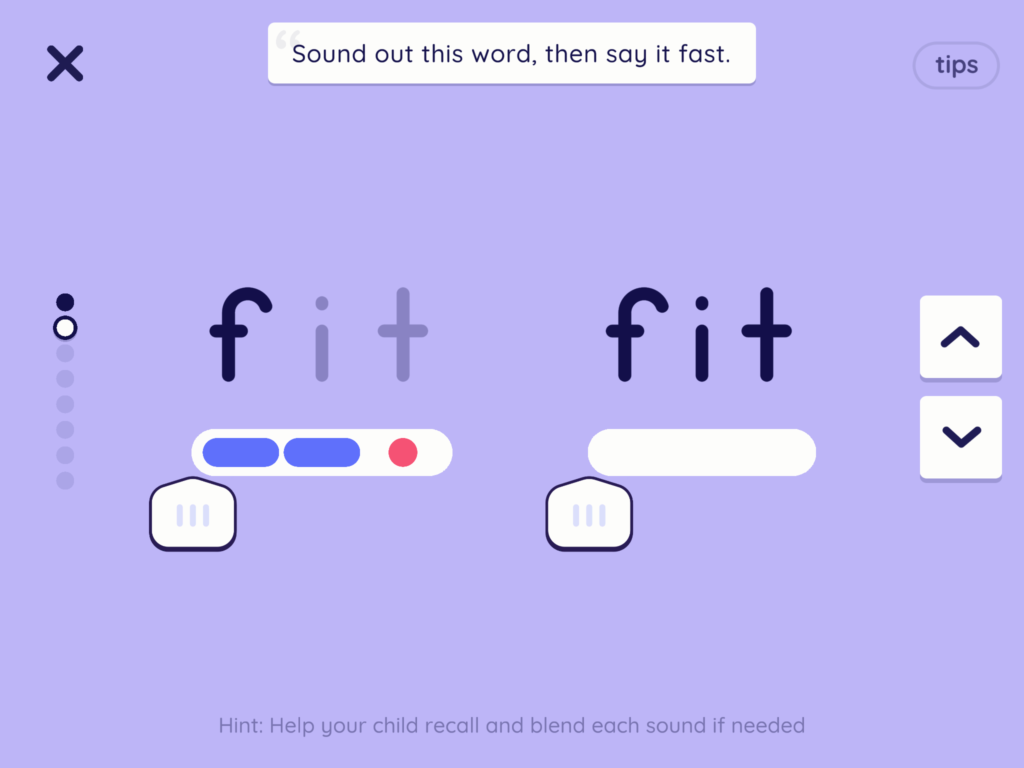
These slides have been incredibly helpful for us.
And that is precisely what our breakthrough #3 is going to be all about…
#3: Using good-quality literacy apps
I am just going to name two of my favorite apps (at the time of writing this article) for learning to read, and briefly tell you why I like them.
I won’t go into a lot of detail, as I have other reviews and articles specifically about this topic, like this one or this one.
App #1: Reading. com
The main reason I like this app so much is the digital sliders, as mentioned earlier.
They have really worked the wonders for us.
I think they have truly contributed to that ‘click’ in children’s minds that needs to happen, so they fully understand how blending works and start to automate the process.
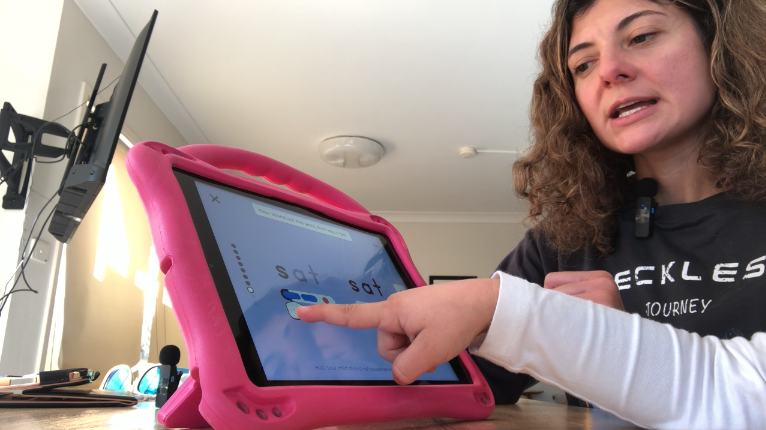
While there are other features I appreciate in this app, the digital sliders are the standout for me. If you want to learn more about this app, check out my full review about reading. com here!
App #2: Readability Tutor
Kids need daily reading practice to master decoding, and achieve real automaticity and fluency. During the beginning stage, it’s crucial for an adult to be next to them to provide corrective feedback.
While 10 to 20 minutes is usually more than enough, family life can be extremely busy at times, making it impossible to stick to this important daily practice
This is when Readability Tutor fits in! If you’re going through a particular busy time, you can have your child passages and books at their level in the app while receiving corrective feedback for their mistake.
This app is also a great choice for children who need extra reading practice but feel anxious reading in front of others.
The “no-judgment” environment allows kids to practice at their own pace while still receiving meaningful feedback.
Offers a 30-day free trial here
Would you like to download a summary of this article?
For you to keep and refer to any time anywhere!
#4: Using continuous blending
When kids are trying to sound out words, they usually learn what we call “broken” or “choppy” blending. This means they say each sound in a word separately without connecting them. For example, in the word “map,” choppy blending sounds like “m – a – p,” and for “cat,” it’s “k-a-t.” There’s a little pause between each sound.
Now, there’s nothing inherently wrong with this method, but unfortunately it can be confusing for many kids because they struggle to connect the sounds together. You might have heard of some tricks to help with this, like using your arms to show the sounds or stretching your hands for each sound.
These can be helpful, but there’s a better way: continuous blending, also known as smooth blending.
With smooth blending, you blend the sounds smoothly together to say the whole word, like “mmmmaaaaaap” or “maaaat.” I like to call this the “hold-the-sound” technique. Instead of just saying the sound quickly, you hold onto it a bit longer.
It’s made a huge difference for us, so I highly recommend giving it a try. I’ve talked about this technique in more detail in the past (for instance, in this article or in this video).
So, if your child knows the sounds but struggles to blend them in words, you definitely want to try this out!
Now, let’s move on to the last really helpful thing…
#5: Align sight word instruction with phonics
Unfortunately, sight word instruction is, in most cases, disconnected from phonics instruction.
So, on the one hand, your child is learning basic phonics principles and, in order to put his/her phonics skills into practice he/she is probably reading very simple, very regular cvc words (cat, mat, dog, log, top, etc.)
That’s all good. It makes sense. Those words do NOT contradict what he/she is learning in his/her phonics lessons.
On the other hand, completely disconnected from these phonics lessons are sight words (or heart words, instant words, high-frequency words… people call them different names).
The most common way to introduce them is by frequency order.
In other words, whether the phonics rules that govern these words have been taught explicitly to children or not, is not taken into consideration.
Now, this can throw kids for a loop. Why? Because some of these common sight words play by more complicated phonics rules (that your child has simply not learned yet) or are phonetically irregular.
So, what happens then?
Children are normally just asked to memorize these words without having a proper understanding of their spelling patterns.
This can be extremely confusing for them and very taxing on their memory.
So what’s a parent or teacher to do?
I’m not saying don’t teach them very important sight words like “the” or “you”, especially if you are already reading books, but my point here is:
Understand the complexity of what you are asking children to do, and reduce to a bare minimum the number of sight words you teach them that contradict what they know at this point about phonics.
On top of that, as much as you can, align the introduction of high-frequency words with the rest materials you are using to teach your students to read. This will allow students to understand the spelling patterns these words have, leading to long-term memory retention.
For instance, say you are further on your kid’s learn to read journey, he or she’s learning all about the “magic e” rules, in words like “make,” “take,” or “made.” Well, at this point your child will be able to sound out these so-called “sight words” without the need of memorization. Just applying the rules he or she is learning in his phonics lessons.

Other helpful tips are:
Using symbols and color-coding words. This is precisely what we did in our high-frequency word phonics flashcards.
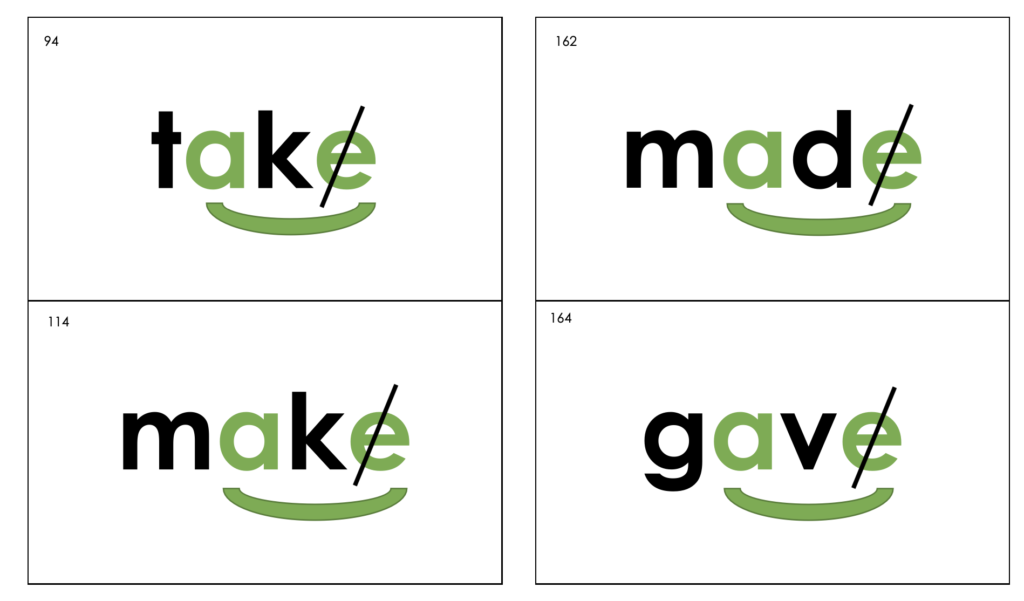
These symbols are pretty intuitive and facilitate reading. They’re like little “cheat codes” for reading success.
Grouping words that follow similar irregular patterns together and teaching them at the same time. For instance:
- to, do, into
- any, many
- could, would, should
There are more things I could actually add to sight words instruction. This is a big thing in reading instruction, but it’s enough for today’s article. If you want to learn more about this topic, check out this article.

Interested in knowing even more about our High-Frequency Words Phonics Flashcards? Available at the “Discover Our Literacy Materials” section. Check details below!
Would you like to download a summary of this article?
For you to keep and refer to any time anywhere!

Hey there! I’m Laura – an author, YouTuber, blogger, and the creator of the “Learning Reading Hub” platform. I created this space to dive into the world of reading instruction and to shout from the rooftops about how vital it is to use the right methods for teaching reading. I’ve got a TEYL certification (Teaching English to Young Learners), plus a Journalism degree from the University of Navarra in Spain, along with a Master’s Degree in Communication.
I’ve always loved digging into research, jotting down my thoughts, connecting with people, and sharing what makes me tick. With a background in marketing, digital projects, and the education scene (especially language learning), I’m all about wearing different hats.
When my first kid needed to learn how to read, it opened my eyes to the challenges and complexities involved. This journey took me through a rollercoaster of self-teaching, eye-opening discoveries, and yeah, some letdowns too. There’s so much conflicting info out there, along with methods that just don’t cut it. And let’s face it, these issues are way too common.
Now, I’m all about channeling that passion (without sounding like a know-it-all!) and sharing my journey. My mission? Making it easier for those who are on the same path I once was.
My heart’s with my family and the amazing Learning Reading Hub project. I live with my husband and two little ones, raising them in a bi-lingual environment (English and Spanish).


